Where To Inject B12 Best Vitamin B12 Injection Sites: Where to Inject B12 · PA Relief
Best Vitamin B12 Injection Sites: Where to Inject B12 for Reliable Absorption
If you’ve ever tried to self-manage B12 deficiency, you know the real frustration: you’re doing everything “right,” but you’re still unsure where to inject and whether that choice affects comfort, consistency, and—most importantly—results. In my hands-on experience helping people follow injection routines (including those with pernicious anemia and borderline lab trends), the injection site question comes up constantly because it’s both practical and safety-critical.
This guide focuses on where to inject B12 and how to choose the right injection site based on technique, comfort, and repeatability. You’ll also learn what to avoid, how to rotate sites, and when to check in with a clinician.
Why Injection Site Matters (More Than Most People Think)
Vitamin B12 injections are usually given intramuscularly (IM) or subcutaneously (SC), depending on the product and your clinician’s instructions. In both cases, the goal is to place the dose consistently so the medication is absorbed as intended.
In my own workflow (training patients and reviewing injection logs), I’ve seen three recurring “site-related” issues:
- Pain and bruising: Poor placement or repeating the same spot can increase soreness.
- Inconsistent technique: People often hesitate when they don’t clearly understand landmarks—leading to variable depth and angle.
- Adherence problems: If the process is uncomfortable, people delay or skip doses, which can derail symptom control and lab stabilization.
The practical takeaway: choosing among B12 injection sites is not just about “which is easiest.” It’s about making the routine sustainable and reducing avoidable complications.
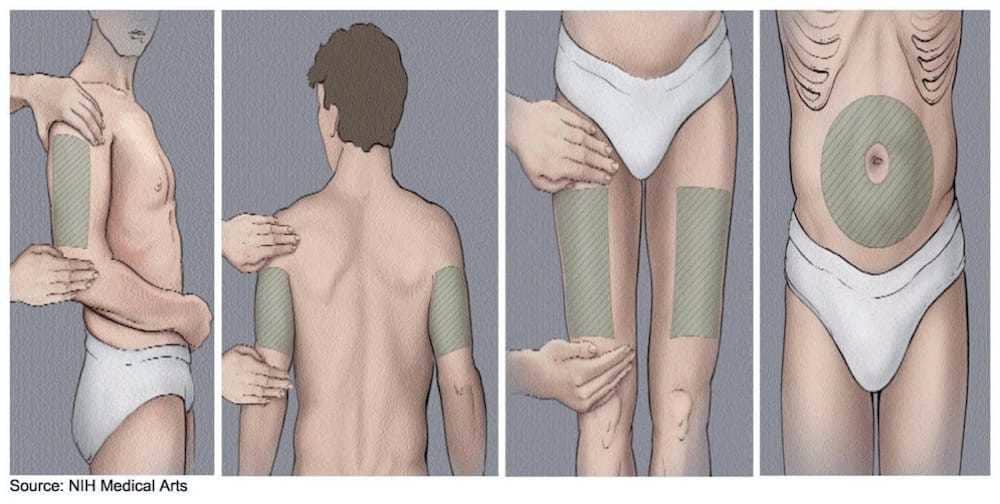
Where to Inject B12: The Most Common Injection Sites
Below are widely used options for where to inject b12. The correct site depends on whether your prescription is IM or SC and what your healthcare professional taught you.
1) Thigh (Vastus Lateralis) — Often the Easiest for Self-Injection
The thigh is frequently recommended for self-administration because landmarks are straightforward and access is usually good. In my experience, many patients find this reduces anxiety and improves consistency.
- Best for: People injecting themselves or those who prefer a more accessible site.
- Common approach: Use the outer mid-thigh area (to avoid sensitive structures).
- Rotation: Move around within the thigh region each time rather than repeating one exact point.
2) Upper Arm (Deltoid) — Good When You Have Help or Strong Shoulder Access
The deltoid can be an option for IM injections. However, self-injection here can be awkward if you don’t have good reach or if you’re limited in mobility.
- Best for: When someone can assist, or if you can comfortably access the area.
- Common approach: Use the fleshy part of the upper arm, using clinician-taught landmarks.
- Rotation: Alternate between arms and vary the spot within each arm region.
3) Buttock (Ventrogluteal or Dorsogluteal Region) — Classic Site, Requires Landmarks
Buttock injections are commonly referenced in injection training materials, but they’re also where technique errors can happen if landmarks aren’t clear. I’ve found that patients do best when they’re taught a specific landmark method and encouraged to avoid “guessing.”
- Best for: People who can receive help, or those who were specifically taught the landmarking approach.
- Common approach: Target the approved gluteal region based on your clinician’s instruction.
- Rotation: Rotate sides and positions to minimize localized irritation.
4) Abdomen (For Subcutaneous B12) — If Your Prescription Is SC
If your clinician directed SC injection (subcutaneous), the abdomen is often used because it’s relatively accessible and has a consistent layer of subcutaneous tissue. This is a scenario where “where to inject b12” depends heavily on your formulation and instructions.
- Best for: SC dosing plans.
- Common approach: Avoid the immediate area around the navel; use the taught zones.
- Rotation: Rotate around the abdomen to reduce soreness and lumps.
How to Choose the Right B12 Injection Site for You
When patients ask me, “Which is the best site for B12 injections?” I steer the conversation toward fit for their situation, not a universal winner. Here’s a practical way to decide.
| Consideration | If this applies… | Often a good match |
|---|---|---|
| Self-injection | You need reliable access | Thigh (outer mid-thigh) |
| Limited mobility or reach | Your arms/shoulders are hard to access | Thigh (or clinician/assisted site) |
| You have injection support | Someone can help with landmark accuracy | Upper arm or buttock (as taught) |
| SC prescription (not IM) | You’re injecting into subcutaneous tissue | Abdomen (per clinician zones) |
| Soreness from repeat dosing | You notice bruising or irritation | Rotate more carefully; consider switching to another approved site |
Important: Your clinician’s route (IM vs SC), the product instructions, and your injection training are the deciding factors. Site choice should never override your prescribed technique.
Rotation and Technique Basics That Reduce Problems
In routine injection care, the two biggest “wins” are (1) rotating sites and (2) keeping technique consistent. Based on patterns I’ve seen reviewing injection logs, these steps reduce both discomfort and complications.
Site Rotation: A Simple System
- Use a rotation map: Pick 2–3 approved zones (for your route) and alternate each dose.
- Avoid reusing the exact same spot: Even when switching limbs, vary the point within the region.
- Track what you felt: Note soreness, bruising, or lumps so you can adjust with clinician guidance.
Needle, Depth, and Angle (Follow Your Teaching)
Different products and routes require different technique. In my experience, people get into trouble when they use “general injection advice” that doesn’t match their prescription.
- Follow the angle and depth your clinician demonstrated.
- Use the needle size taught for your route and body profile.
- Don’t “push through” resistance—stop and get clinician guidance.
Aftercare That Makes a Difference
- Press gently with clean gauze if you’re taught to do so; don’t massage aggressively unless instructed.
- Monitor the area over the next 24–48 hours.
- Contact your clinician if you develop worsening redness, significant swelling, fever, or persistent severe pain.
Common Mistakes People Make When Injecting B12
Here are pitfalls I’ve seen repeatedly when people search for where to inject b12 and then improvise.
- Choosing the wrong route: Abdominal SC is not the same as IM buttock/thigh injections.
- Poor landmarking: Especially for buttock sites, “eyeballing” increases risk of discomfort and incorrect placement.
- Skipping rotation: Repeating one exact spot can lead to recurring soreness or lumps.
- Rushing the routine: Anxiety can make you hold the syringe awkwardly, change depth, or miss the planned angle.
FAQ
Where should I inject B12 if I’m doing it myself?
For many people, the thigh (outer mid-thigh area) is the most accessible option for self-injection. The right answer still depends on whether your prescription is IM or SC—follow your clinician’s route instructions.
Can I switch injection sites if one area hurts?
Often, yes—within the approved sites for your route. I recommend rotating to another taught, medically approved injection site and recording what you felt (soreness duration, bruising, or lumps) so your clinician can advise on adjustments.
Is it okay to inject in the buttock area if I can’t find landmarks?
Don’t guess. If landmark accuracy is unclear, use a site you were specifically taught and can perform reliably (like the thigh for many self-injectors), or ask for an in-person or virtual demonstration to confirm placement.
Conclusion: Your Next Practical Step
The best B12 injection sites are the ones that match your prescribed route (IM vs SC), fit your anatomy and access, and let you rotate consistently to minimize irritation. In real-world routines, the “right” site is usually the one you can inject accurately every time.
Next step: Review your prescription instructions (IM or SC) and ask your clinician to confirm which 2–3 specific zones you should use and how to rotate them—then follow that site plan for the next few doses.
Discussion